Sign In

Powrmatic Flue.
One of the most frequently asked questions we get over here at warmairheaters.com from installers is how to correctly flue a Powrmatic appliance. Everything you ever need to know is noted in the “Powrmatic User, Installation And Service Instructions” which can be freely downloaded from www.powrmatic.co.uk at any time. Although the cabinet heaters are pretty straightforward, confusion arises more with the Powrmatic NVx suspended heaters because of the different flue types available. Lets take a quick look at the Cabinet Heater flue requirement first.
Powrmatic Flue CPx Cabinet Heaters
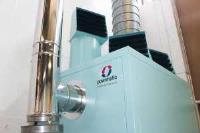
Both the gas and oil cabinet heaters are supplied from the factory with a condensate tee, also commonly known as a boot tee. This should be located directly onto the flue spigot of the heater and fixed into place.
Powrmatic Flue On A Cabinet Heater
Powrmatic Cabinet Heaters use “Powrmatic Flue System 1” which is a single wall, welded seam flue with a single crimped end to allow jointing to the next section. Twin wall (Nova sm) is also available if required.
The powrmatic flue system connected to this tee must be a closed system chimney that conforms to the requirements of EN1856-1, must be appropriately designed and components designated as suitable for the type of installation. By using Powrmatic System One flue, these requirements will be met.
The powrmatic flue system must never reduce in size and should always be either the same cross sectional area as the condense tee or larger in certain circumstances. Connections onto old flue systems of a larger cross sectional area are allowed but this should be avoided as condensation can occur internally. As the hot flue gasses pass from the condense tee into a larger flue, the velocity of the flue gasses naturally slows down as the area increases.
Environmental temperature effects of the heated space against the flue can cause the flue gasses to cool below dew point and cause internal condense to form inside the flue. The condense tee prevents this condense from flowing back into the heat exchanger on the appliance to avoid heat exchanger damage by corrosion.
If you install the heater to an existing flue and condense occurs, consider piping the water catchment trap to a drain, following any guidance or regulations that are applicable. This will prevent condense from entering the burner and causing electrical issues. It is important to note that flue gasses contain mild acids which can attack certain materials. Condense pipework must always be a non-corrodible material of minimum 3/4” (22mm) size. Copper pipe is not satisfactory.
The powrmatic flue system must have a minimum length of 2M from the condense tee to the terminal. In most cases you will need much more than this to install the flue to regulations. This mainly applies to external heaters where you could have one installed on a roof for example. The 2M minimum requirement creates the necessary back pressure inside the combustion chamber similar to a vehicle exhaust pipe.
Horizontal flue should ideally be avoided in all cases where practical to do so. In the event that you have to install a section of the flue horizontally, the ratio of 3:1 should be maintained in all cases. There should always be three times more vertical flue than horizontal.
In order to pass through a wall or avoid an obstruction, the use of two 45 Degree elbows must always be used. It is not permissible to use two 90 Degree elbows on a cabinet heater as the resistance to flow against the flue gasses is too high.
The powrmatic flue outlet must always have a correct terminal installed. In most cases a gas terminal would be used (Sweedish Cowl) or a standard oil terminal (Chinaman’s Hat) for oil. If the flue size is greater than 8” an approved terminal is not always necessary but we strongly advise that the correct terminal is used at all times.
Sufficient flue brackets must be installed to hold the weight of the flue system. The connection to the heater is not classified as a sufficient bracket as this can require disconnection for service and maintenance.
The flue must terminate externally to the building strictly following regulations as flue gasses contain carbon monoxide and in certain quantities can kill!
Location of the flue must also consider where products of combustion could re-enter the property for example:-
300mm below an opening e.g. window, air brick etc.
200mm below eaves or gutter.
300mm from an internal or external corner.
1200mm from a surface facing the terminal.
1500mm vertically from another terminal on the same wall.
300mm horizontally from another terminal on the same wall.
2000mm from ground level
These are taken directly from the Powrmatic CPx OEM manual and could change with later revisions. Ensure you consult the OEM Manual currently in force supplied with the heater.
For roof penetrations use the Powrmatic High Temperature Flashing Kit. They work exceptionally well and if installed to manufacturers instructions will never leak.
For each cabinet heater a change over section is required. This is a length of flue pipe which is crimped both ends and used to connect the terminal the correct way round.
Straight lengths of flue pipe are available in 1500mm, 970mm and 470mm lengths.
Change over sections are also available 938mm and 438mm lengths.
Adjustable sections are also available where tight or awkward flue runs need to be completed. They are supplied in two different variations and can be adjusted from 297mm to 466mm or 447mm to 700mm.
Each and every joint should utilise a locking band and rubber seal. The seal is placed over the joint and the locking band fitted to hold the flue joint together and help prevent leaks.
The Powrmatic System 1 flue assembles fairly easily and if the above is followed there should never be issues with the flue.
Powrmatic NVx, NVs and VPC Heaters
These are the more modern design of heaters using tubular heat exchangers and utilise the new seamless spun flue system. Its important to use the genuine Powrmatic flue and accessories for these heaters.
The most confusing issue to new installers is the single wall vs concentric installation.
Single wall installation is similar to a cabinet. The heater has one flue pipe from the appliance which exist the building and discharges products of combustion.
Concentric utilises a special terminal, similar to a combination boiler with a special adapter which then splits the flue into two separate runs. Products of combustion are discharged through the inner section of flue while fresh air is supplied via the outer flue. This combination forms a room sealed appliance with a balanced flue.
Probably the biggest factors to determine if a concentric (room sealed) installation is required are :-
Combustion air
As you all know, gas heaters require fresh air to correctly burn gas. If the building has no natural ventilation and you can’t guarantee enough is available for normal use, a concentric system provides sufficient combustion air for the combustion process.
Dirty Environments
Engineering workshops, machine rooms etc all have high levels of airborne dirt and dust which can quickly cause a heater to fail. By using fresh external air in a room sealed configuration, contaminants inside the heater are kept to a minimum. You will be amazed how quickly the inside of a heater can become filthy dirty with airborne contaminants. It sticks to the insides of the heater, probes, the fan and will quickly cause fails.
The next question is to horizontally or vertically flue? This is really dependant on site specifics and if the terminal and flue can be installed to regulations. Horizontal flue can take out the requirements to roof work but remember if the flue can be touched or reached by anyone a wire guard should be fitted.
So this gives you four possibilities in all, Concentric vertical or horizontal and single wall vertical or horizontal.
The Powrmatic NVx, NVs and VPC heaters can all have the fan flue spigot rotated to offer a vertical or horizontal configuration. This is easily carried out by the installer on site in about ten minutes. The combustion fan is unscrewed, outlet covers swapped and the fan screwed back into place. The combustion air spigot is also easily changed by swapping the spigot and blank plate and a few screws. This keeps the flue system nice and neat for either orientation.
Single wall is probably the easiest install and just like the cabinet simply needs the flue taking to a permissible outside location.
For both types of flue, the maximum linear run is 6M. Use of a 90 Degree counts as 1M of flue so its always best to follow the manufacturers instructions to plan the flue design first.
Concentric uses a larger terminal section which comes as a kit with a single to twin converter section called a ski boot. When the terminal is installed and the ski boot is fixed in place, two separate flue pipes are taken to the heater.
The design of the heater is so that the spacing between the spigots will always marry up with the ski boot for a vertical run without needing any elbows.
Component wise :-
Both systems use common flue pipe.
Standard lengths are 200mm, 500mm and 1000mm.
Adjustable lengths are available sized 75mm to 230mm.
45 Degree and 90 Degree elbows are also available.
Flue terminals are supplied in four variants namely.
Single wall horizontal terminal.
Single wall vertical terminal.
These are nice and easy to fit and simply push directly into a flue pipe spigot.
Concentric horizontal and concentric vertical are also available but best ordered as a kit. The kit contents are shown below.
Again, locking bands are available to reinforce the powrmatic flue joint connections and flue systems should be adequately supported throughout their entire run.
In any case, if you need specialist advise on flue requirements then contact us here at warmairheaters.com for free friendly advise, or consider calling Powrmatic directly.
For more information on Powrmatic Flue – An Easy Guide To Selection And Installation talk to Warmairheaters.com
Welcome back to FindTheNeedle.
Not registered? Get listed — most visitors don't have an account yet.
List your company on FindTheNeedle.