Sign In


How To Bleed A Diesel Generator
24-06-2022
Is your diesel generator difficult to start? Perhaps it is refusing to start at all. Or maybe it does start but then splutters out a short time later. If so, then it might be time for you to bleed your diesel generator.
Don’t worry, it’s an easy job once you know how and this, no-nonsense, guide will lead you through the process of bleeding your diesel generator step-by-step. We will also explain why bleeding and priming is an important part of maintaining and caring for your diesel generator.
Why Do You Have To Prime Or Bleed A Diesel Engine?
A diesel generator is like any other diesel engine in that it should not be run dry, that is running it without fuel already in the cylinders, as it could cause serious damage.
To avoid running it dry, the diesel engine should be primed before its first use, when it has been repaired, when the filters have been changed or tinkered with, or if it has run out of fuel. This is to avoid air filling the spaces where the fuel should be.
Sometimes air enters the diesel engine via other routes, such as leaks, too.
Whether your diesel generator has a leak that is allowing air into the system, or whether it has been run dry and got air into it, the way to fix the problem is by bleeding the engine.
How To Bleed A Diesel Generator
To bleed, or remove the air from, your diesel generator there are just a few simple steps to follow.
1. Identify The leak
If your diesel generator has not been run dry, the filters have not been changed or has been primed before use properly, then it is time to look for the leak.
Visually and manually checking all the connections, there may be bubbles appearing or signs of fuel having escaped, if there is a leak. If a connection is loose, then fix the problem.
If there are no visible signs of a leak at the connections, then check the fuel lines. Any particularly dusty or grimy areas may suggest there is a leak as dirt will stick to the leaked fuel. Replace any fuel lines, as required.
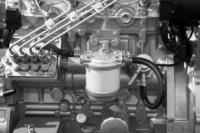
2. Back Off The Bleed Screw
For this step, first, ensure you have some rags handy to mop up the spills. Then, locate the bleed screw which is usually on top of the filter. Loosen the bleed screw, 2 or 3 turns should be sufficient. You don’t need to take it out.
3. Operate Manual Fuel Pump Primer
Locate the fuel pump primer on the engine by the filter and begin to manually pump it. As you do this, look at the bleed screw and you will see bubbles forming around it as the air escapes. Keep watching, pumping and mopping up the oil until it is only bubble-free fuel escaping from the bleed screw. Then, continue to pump while you tighten the bleed screw. This will make sure that no air sneaks back in whilst you tighten it.
Still Having Problems?
If you have located a leak, fixed it and successfully bled your diesel generator engine following the above steps but are still having problems starting your generator, then there may be another fault. Get in touch with us at Generator Pro to book a service, to ask our team of experts a question, or if your generator has powered up for the last time then feel free to browse our shop.
For more information on How To Bleed A Diesel Generator talk to Generator-Pro
Welcome back to FindTheNeedle.
Not registered? Get listed — most visitors don't have an account yet.
List your company on FindTheNeedle.